Preparing for Your Telehealth Appointment With Shields & Shields

Preparing for Your Telehealth Appointment

Please follow the steps below. This will begin the process, but will not schedule your appointment date & time.

Step 1

Take photographs of the affected eye before your appointment:

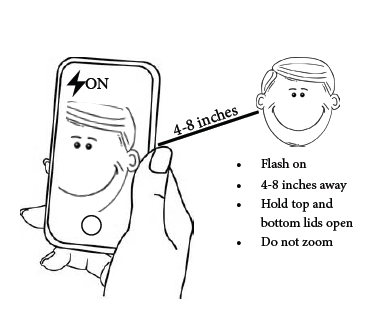
Using a cell phone camera with the flash turned ON, hold phone 4-8 inches away from the patient. To ensure focus, tap the screen until the picture is clear.
Do not zoom. Make sure patient holds both top and bottom eyelids open.

Screen Shot 2016-05-05 at 1.40.17 PM

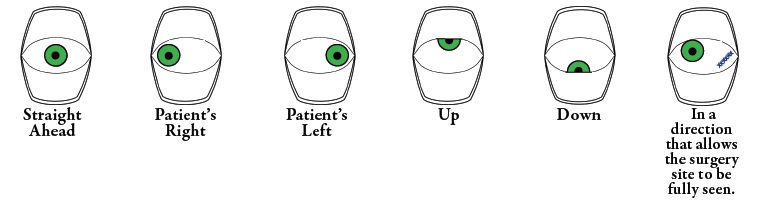
Take photographs of the following gazes for the affected eye(s):

Screen Shot 2016-05-05 at 1.51.53 PM


Email photographs of the affected eye to [email protected]

Step 2

Do you currently have any...

Discharge?

Discomfort/Pain?

Redness?

Swelling?

Blurry/Double Vision?

Send your answers to [email protected]

Step 3


Please take the following vision tests
Send your results to [email protected]
You can simply circle the lines you can read, take a picture & send it.

Visual Acuity Screening

When printed, print Actual Size without margins.

If displayed on a screen, adjust scale so the circle is 1 inch in diameter, approximately the size of a US Quarter Dollar Coin.

Banner Eye Care Visual Acuity Test 1.4 – Mount on Wall 5 feet from Patient, away from Window or Light Source.
This Page is ANSI Letter sized (8.5”x11”).

Test distance 5 feet.


Further screening is available with near vision screening and

Near Vision & Amsler Grid Screening

Design by University of Arizona Ophthalmology and Vision Science, for COVID-19 Pandemic Monitoring, April 3 2020

Telehealth App

Your video consultation will take place using the Patient Portal.
This can be done via the website https://shields.ema.md or the PocketPatient app:

Telehealth Patient Instructions